 G
G B D G
B G
G
G B D G
B G
(THIS IS A COMPILATION OF ALL 3 LESSONS)
What A 'Gmaj' Chord Has In Common With A 'Gmaj' Scale Part 1
- Over the next few weeks, we'll explore the Gmaj scale in different locations of the fret board, and see how it fits into the Gmaj scale in the same area of the fret board. This will consist of at least three parts.-
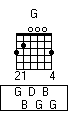
This week, we're going to view the Gmaj chord and scale in the open position.
FIGURE 1 LISTEN TO IT
Okay, first let's look at the 'Gmaj' chord in the open position...
G
G B D G
B G
e||--3----------------|---------------------------3----||
B||--0----------------|----------------------0---------||
G||--0----------------|-----------------0--------------||
D||--0----------------|------------0-------------------||
A||--2----------------|-------2------------------------||
E||--3----------------|--3-----------------------------||
You'll notice in the diagram, the note names are given, along with the fingering. Beside that, the tabbed out version of the chord, both as a single strummed chord (with the chord name above) and as a single note-picked chord (with the note names above.) Try to play the tabbed out notes both with a pick and with your fingers.
Now, how about saying out loud: "Do Ra Me Fa So La Ti Do!" Does that remind you of Elementary School music class? So what does that have to do with the Gmaj scale?
FIGURE 2 LISTEN TO IT
Sing along:"Do Ra Me Fa So La Ti Do Ra Me Fa So La Ti Do"
NOTE NAMES: G A B C D E F# G A B C D E F# G
e||--------------------------|--------------0--2--3----||
B||--------------------------|-----0--1--3-------------||
G||-----------------------0--|--2----------------------||
D||--------------0--2--4-----|-------------------------||
A||-----0--2--3--------------|-------------------------||
E||--3-----------------------|-------------------------||
Great! That's the Gmaj scale in the open position. Try playing that both with a pick and just your fingers. Remember that it's more important to get it right than fast, so start of slowly. You are trying to play the scale crisply, cleanly, accurately, without hesitation, forwards and backwards, and without looking! You will be able to speed it up with more practice.
So how does that work into creating guitar fills? First, let's find out what a guitar fill is. That's the music you hear for example after B.B. King sings the phrase "You know you shook - me - ba - by. You shook me all night long." Or the little licks you hear in the background of your favorite country tune. Try just pulling something out of the scale, for instance...
FIGURE 3 LISTEN TO IT
Fingering: 4 X 4 X 1 3 1 2
e||------3--0--------------------|
B||------------3-----------------|
G||------------------------------|
D||---------------0--2--4--------|
A||------------------------2-----|
E||---------------------------3--|
Although that is something simple, it takes finger control. The numbers above the tab represent the fingers that I recommend be used to play each note. (T = Thumb; 1 = First/Pointer; 2 = Middle; 3 = Ring; 4 = Pinky; and X = None.) Once you've got that little lick down, try playing the chord in front of it. And when you can do that, we'll get a little fancy!
FIGURE 4 LISTEN TO IT
Fingering: 4 X 4 X 1 3 1 2
e||--3----3--0--------------------|
B||--0----------3-----------------|
G||--0----------------------------|
D||--0-------------0--3--4--------|
A||--2----------------------2-----|
E||--3-------------------------3--|
Now by using the fingering given, your hand stays very close to being able to play the original chord at any time throughout the lick. Sometimes, to get a specific effect on a note, you have to use different fingering. FIGURE 5 plays the same pattern, but differently. We begin to use bends to bring our notes alive, to give them character. Try bending them with the fingering given in FIGURE 4, then you'll understand why the fingering has changed! It's pretty hard to bend a note with your pinky, especially way down there on your neck!
FIGURE 5 LISTEN TO IT
Fingering: 2 X 2 X 2 2 1 2
e||--3----2b-0--------------------|
B||--0----------2b----------------|
G||--0----------------------------|
D||--0-------------0--3--3b-------|
A||--2----------------------2-----|
E||--3-------------------------3~-|
Now, you must practice getting back to the original chord as soon as you're finished with the lick. Over the next few days, play around with the scale and see what little licks you can create. Remember to take it slow, accuracy counts! See you next week!
What A 'Gmaj' Chord Has In Common With A 'Gmaj' Scale Part 2
This week, we're going to view the Gmaj chord and scale beginning at the third fret.
FIGURE 1 LISTEN TO IT
Okay, first let's look at the 'Gmaj' chord at the fifth fret...
 G
D G D G
B
G
D G D G
B
e||--7----------------|----------------------7--------||
B||--8----------------|-----------------8-------------||
G||--7----------------|------------7------------------||
D||--5----------------|-------5-----------------------||
A||--5----------------|--5----------------------------||
E||-------------------|-------------------------------||
You'll notice in the diagram above and to the left, the note names are given, and so is the fingering. Beside that, the tabbed out version of the chord, both as a single strummed chord (with the chord name above) and as a single note-picked chord (with the note names above.) Try to play the tabbed out notes both with a pick and with your fingers. Were you able to cleanly fret the chord, and pick it cleanly, too? It's a bit harder to get a clean sound here than in the open position (last week).
Now, how about saying out loud: "Do Ra Me Fa So La Ti Do!" That's right, we're doing that again this week!
FIGURE 2 LISTEN TO IT
Sing along:"Do Ra Me Fa So La Ti Do Ra Me Fa So La Ti Do"
NOTE NAMES: A B C D E F# G A B C D E F# G A B
e||--------------------------|--------------------5--7--||
B||--------------------------|-----------5--7--8--------||
G||--------------------------|--4--5--7-----------------||
D||-----------------4--5--7--|--------------------------||
A||-----------5--7-----------|--------------------------||
E||--5--7--8-----------------|--------------------------||
It can also look like this: As you can see, I've moved some notes to the 9th and 10th frets!
e||--------------------------|------------------------7--||
B||--------------------------|--------------7--8--10-----||
G||--------------------------|-----5--7--9---------------||
D||--------------------5--7--|--9------------------------||
A||-----------5--7--9--------|---------------------------||
E||--5--7--8-----------------|---------------------------||
That's the Gmaj scale starting at the 5th fret. The second example is easier for me! Can you play it both with a pick and just your fingers? Again, remember it's more important to get it right than fast, so start of slowly. Try to play the scale crisply, cleanly, accurately, without hesitation, forwards and backwards, and without looking! You will be able to speed it up with more practice.
Now it's time to find a guitar fill in this position. Before you look below, try pulling something out of the scale on your own.
FIGURE 3 LISTEN TO IT
Fingering: 1 3 2 3 1 3 1 3
e||--------------------------||
B||--------8-----------------||
G||--7--9-----9--7-----7-----||
D||-----------------9-----9--||
A||--------------------------||
E||--------------------------||
Although that is something simple, it takes finger control. The numbers above the tab represent the fingers that I recommend be used to play each note. (T = Thumb; 1 = First/Pointer; 2 = Middle; 3 = Ring; 4 = Pinky; and X = None.) Once you've got that little lick down, try playing the chord in the front and back of the lick. And when you can do that, we'll get a little fancy!
FIGURE 4 LISTEN TO IT
Fingering: 1 3 2 3 1 3 1 3
e||--7----------------------|--------7------------||
B||--8----------8-----------|--------8------------||
G||--7----7--9-----9--7-----|--7-----7------------||
D||--5-------------------9--|-----9--5------------||
A||--5----------------------|--------5------------||
E||-------------------------|---------------------||
Now by using the fingering given, your hand stays in the same location which means your fingers do the moving. At times, to get a different effect on a note, you have to use different fingering. FIGURE 5 plays the same pattern, but this time I incorporate two slides. This is another way to give the notes character. Try sliding them with the fingering given in FIGURE 4, then you'll understand why the fingering has changed! You may find that you like the original fingering better, but I found that when using the slide technique to play these notes, I was more comfortable using my middle finger.
FIGURE 5 LISTEN TO IT
Fingering: 2 2 1 2 2 3 1 2
e||--7----------------------|--------7------------||
B||--8----------8-----------|--------8------------||
G||--7----7/-9-----9\-7-----|--7-----7------------||
D||--5-------------------9--|-----9--5------------||
A||--5----------------------|--------5------------||
E||-------------------------|---------------------||
FIGURE 6 LISTEN TO IT
Okay, here's another descending pattern very similar to the one above. In fact, the only difference besides the note spacing is the last couple of notes....I added some new ones.
e||-------------------------------|----------7----------||
B||--------8~---------------------|----------8----------||
G||--7r-9-------9--7-----7--------|----------7----------||
D||-------------------9-----9--7--|----------5----------||
A||-------------------------------|--7---5---5----------||
E||-------------------------------|---------------------||
Can you believe the difference that note spacing can make? The red notes are triplet 8th notes, and the blue ones are dotted 8th notes. Doesn't that add a different feel to the fill?
Now, practice getting back to the original chord as soon as you're finished with the lick. Go back to the first lesson and compare both chords and scales. How do they sound alike? How do they sound differently? Over the next few days, play around with both scales and see what little licks you can create. Remember to take it slowly, accuracy counts! See you next week!
What A 'Gmaj' Chord Has In Common With A 'Gmaj' Scale Part 3
This week, we're going to combine the two previous lessons, and experiment with different rhythm patterns and fills.
FIGURE 1 LISTEN TO IT(100BPM)
Let's refresh the old memory and look at the 'Gmaj' chord in the open position...
Are you ready to play a little? Think 'country' !
e||--3--------------3----|-----------------3--3--|--3--------------3----|
B||--0--------------3----|-----------------3--3--|-----------------3----|
G||--0-------------------|--0--------------------|--0-------------------|
D||--0-----------0-------|--------------0--------|--0-----------0-------|
A||--2------2------------|---------2-------------|---------2------------|
E||--3-------------------|--3--------------------|--3-------------------|
------3--0----------------|--3--------------3----|-----------------3--3--|
------------0--1--1b-0~---|-----------------3----|-----------------3--3--|
--0/2---------------------|--0-------------------|--0--------------------|
--------------------------|--0-----------0-------|--------------0--------|
--------------------------|---------2------------|---------2-------------|
--------------------------|--3-------------------|--3--------------------|
--3--------------3----|---------8~---------------------|--3------------||
-----------------3----|------8-------10--12--10--8-----|--0------------||
--0-------------------|--7-7b-----------------------9~-|--0------------||
--0-----------0-------|--------------------------------|--0------------||
---------2------------|--------------------------------|--2------------||
--3-------------------|--------------------------------|--3------------||
I've started the tune by strumming the chord in a downward motion, picked a couple of notes, then play a double- stop. That's pretty much how the first 3 "rhythm measures" are played. The 4th measure has the guitar fill, which is played in the open position. That's followed by 3 more rhythm measures. This time, the guitar fill starts up higher on the neck. It's good to practice licks at different locations on the fretboard. The different area sound differently, one area may be faster for you, it looks cooler, and the list goes on and on. Try to play the tabbed out notes both with a pick and with your fingers. Were you able to cleanly fret the chord, and pick it cleanly, too? It sounds different with your fingers than it does with a pick doesn't it? LISTEN TO IT FASTER(120BPM)
Here's another rhythm pattern in the open position that's also a bit country sounding. Try not to move your fretting hand very much...
FIGURE 2 LISTEN TO IT
2x
e||--------3--3---3--3-----------|-------0--0---0------------------||
B||--------3--3---3--3-----------|-------1--1---1------------------||
G||*-------0--0---0--0-----------|-----0-0--0-0-0-----0-----0-----*||
D||*-----0------0------0------0--|-----2------2---0-2---0-2---0-2-*||
A||------2------2------2--0h2----|--3------------------------------||
E||---3--3------3------3---------|---------------------------------||
See if you can play all parts while your hand still 'floats' over the Gmaj chord. Can you play it both with a pick and just your fingers? Again, remember it's more important to get it right than fast, so start of slowly. Try to play it without looking! You will be able to speed it up with more practice.
It's time to really move up and down the fretboard!
FIGURE 3 LISTEN TO IT
e||--3--3------7--7----3--|----------7--7------|--3--3------7--7----3--|
B||--0--0------8--8----0--|----------8--8------|--0--0------8--8----0--|
G||--0--0------7--7----0--|----------7--7------|--0--0------7--7----0--|
D||--0--0------7--7----0--|----------7--7------|--0--0------7--7----0--|
A||--2--2------5--5----2--|----------5--5------|--2--2------5--5----2--|
E||--3--3--------------3--|--------------------|--3--3--------------3--|
--5b-5--0~-------------------||
-----------------------------||
-----------5b-5--2--7~-------||
-----------------------------||
-----------------------------||
-----------------------------||
This is going to take some practice. You've got to be able to accurately play both chords in a short amount of time. You must move your finger quickly and decisively. After playing the chords, the little lick will seem easy! the fill starts with a triplet pull-off Eddie Van Halen style, then ending with a vibrato ringing note.
Next, try to play this ascending pattern. If you learn this, it'll come in handy...
FIGURE 4 LISTEN TO IT
e||--------------------------------------------|
B||--------------------------------------------|
G||--------------------------------------------|
D||-------------------------------------7------|
A||----------------7------7--10--7--10-----10--|
E||--7--10--7--10-----10-----------------------|
-----------------------------------||
-------------------------------8~--||
--------------7-----7--9--7--9-----||
--7--9--7--9-----9-----------------||
-----------------------------------||
-----------------------------------||
FINGER CONTROL. That's what it's all about. It's very important to play it accurately. Speed things up only after you can play it cleanly9 out of 10 times.
Now try the pattern in descending order...
FIGURE 5 LISTEN TO IT
e||--------------------------------------|
B||--8-----8-----------------------------|
G||-----9-----9--7--9--7-----7-----------|
D||-----------------------9-----9--7--9--|
A||--------------------------------------|
E||--------------------------------------|
---------------------------------------||
---------------------------------------||
---------------------------------------||
--7------7-----------------------------||
-----10-----10--7--10--7---------------||
--------------------------10--7--5-3~--||
Once you can play the descending order with a little speed, go back to last weeks lesson and try some of those licks. Can you play them better now?
Go back up to the top of the page. Try playing FIGURE 1, but substitute the guitar fill with a descending order. Play only long enough to fill the measure! Remember to take it slowly until you can play it accurately! LATER!